2025-12-16
Guide to making a website from your Obsidian vault with Quartz
Here's how to turn your Obsidian vault into a website with Quartz and Github Pages. Note that Obsidian has a paid "publish" feature that, if you can afford, could choose instead.
What Quartz can do: folder tree, table of contents, backlinks, graph view, full-text search, page-preview hover. Customization, though too much customization would require knowledge of HTML and CSS.
What Quartz cannot do: plugins like Dataview, import your CSS snippets (you'll have to do it yourself).
There is a technical setup guide, along with a video guide, right on Quartz's website (which is itself built with Quartz so you can have a look at the default appearance), but that language may be hard to understand. If you don't have any troubles following that guide, then great! Otherwise, I will try to walk you through the steps.
Contents
Prerequisites
- Obsidian, duh.
- A Github account.
- If you don't know what "git" is, had just created a Github account, etc., then Github Desktop. This is for transferring the stuff in your Obsidian vault, which is local to your computer to Github, over the internet. If you are familiar with this, then do whatever Git workflow you're most comfortable in.
- A text editor of your choice. Cannot be rich-text editors like Word; cannot be fucking Obsidian itself; could just be Notepad, or even Github's online editor itself. I recommend VSCode but that would be an overkill if you don't already do programming.
- If you'd like to preview the website on your own computer before releasing it for the whole wide world of web, Node.js (scroll down to "get prebuilt node.js"). But note that no one except you is gonna be staring at your site all the time (hopefully) so this is very optional.
Some terms
- Repo = repository
- Git is a version control system that makes repos and records how their code changed, so you can revert back when you fuck up.
- Github is a service that stores Git repos online. There are plenty of other services that do the same thing, but Github is what I'm most familiar with.
- Github Pages is a service that creates websites from Github repos if you want to. It's not the only way to make websites from Github repos, but it's the most convenient.
- Clear cache: instead of getting the same files over and over every time you visit a website, browsers will download these files and show them to you as if you're actually connecting to the internet. These downloaded files are called cache. Cache is your friend because it speeds things up, but sometimes the actual file had been updated but your browser is still showing you the cached version and that's annoying. Use
Ctrl + Shift + RorCtrl + F5to clear the cache and force the browser to get the new files over the internet.
Content structure
Your vault needs an index.md at the very root. That's the only file you have to have, and it will be the homepage of your site. If you already have a homepage, for example, you can rename it index.md. Optionally, index.mds inside each folder can add content to the folder's page.
Normally a file's title is just the file's filename, but Quartz will take the title property in the frontmatter of a file if it exists. Frontmatter in Obsidian is wrapped around ---s at the very start of the file, like
---
title: "Welcome to my paracosm!"
---
In fact, if you type three dashes at the start of the file, Obsidian now automatically adds a nice interface for you to edit frontmatter on.
It's helpful to give a title to every index.md.
Getting the code
Go to https://github.com/jackyzha0/quartz and click the "Use this template" button near the top-right. Click that, and then click "Create a new repository."
In the new page, name your repo something not horrendous. You have two choices here.
- Name it
[your username].github.io. This way, the URL of your website will behttps://[your username].github.io. - Name it some other name. The website URL will be
https://[your username].github.io/[repo name]. For example, my repo name is "tdyww" and my username is Tofutush, so my website is https://tofutush.github.io/tdyww.
Your choice. It can be changed later anyways, so it doesn't matter that much.
You can add a description if you want. Finally, keep the repo public, because Github Pages only allows you to make websites from public repos unless you have the paid tier for some reason. If you're really adamant about keeping the repo private, you can potentially use Neocities instead, but that's a whole 'nother tutorial.
Repo settings
Now you're in your own repo instead of jackyzha0's (to check, see if your username is on the top-left). Go to "settings" tab found at the top. Click the "Pages" tab on the left, and in the "Build and deployment" section select "Github Actions." This enables Github to make a website from your code.
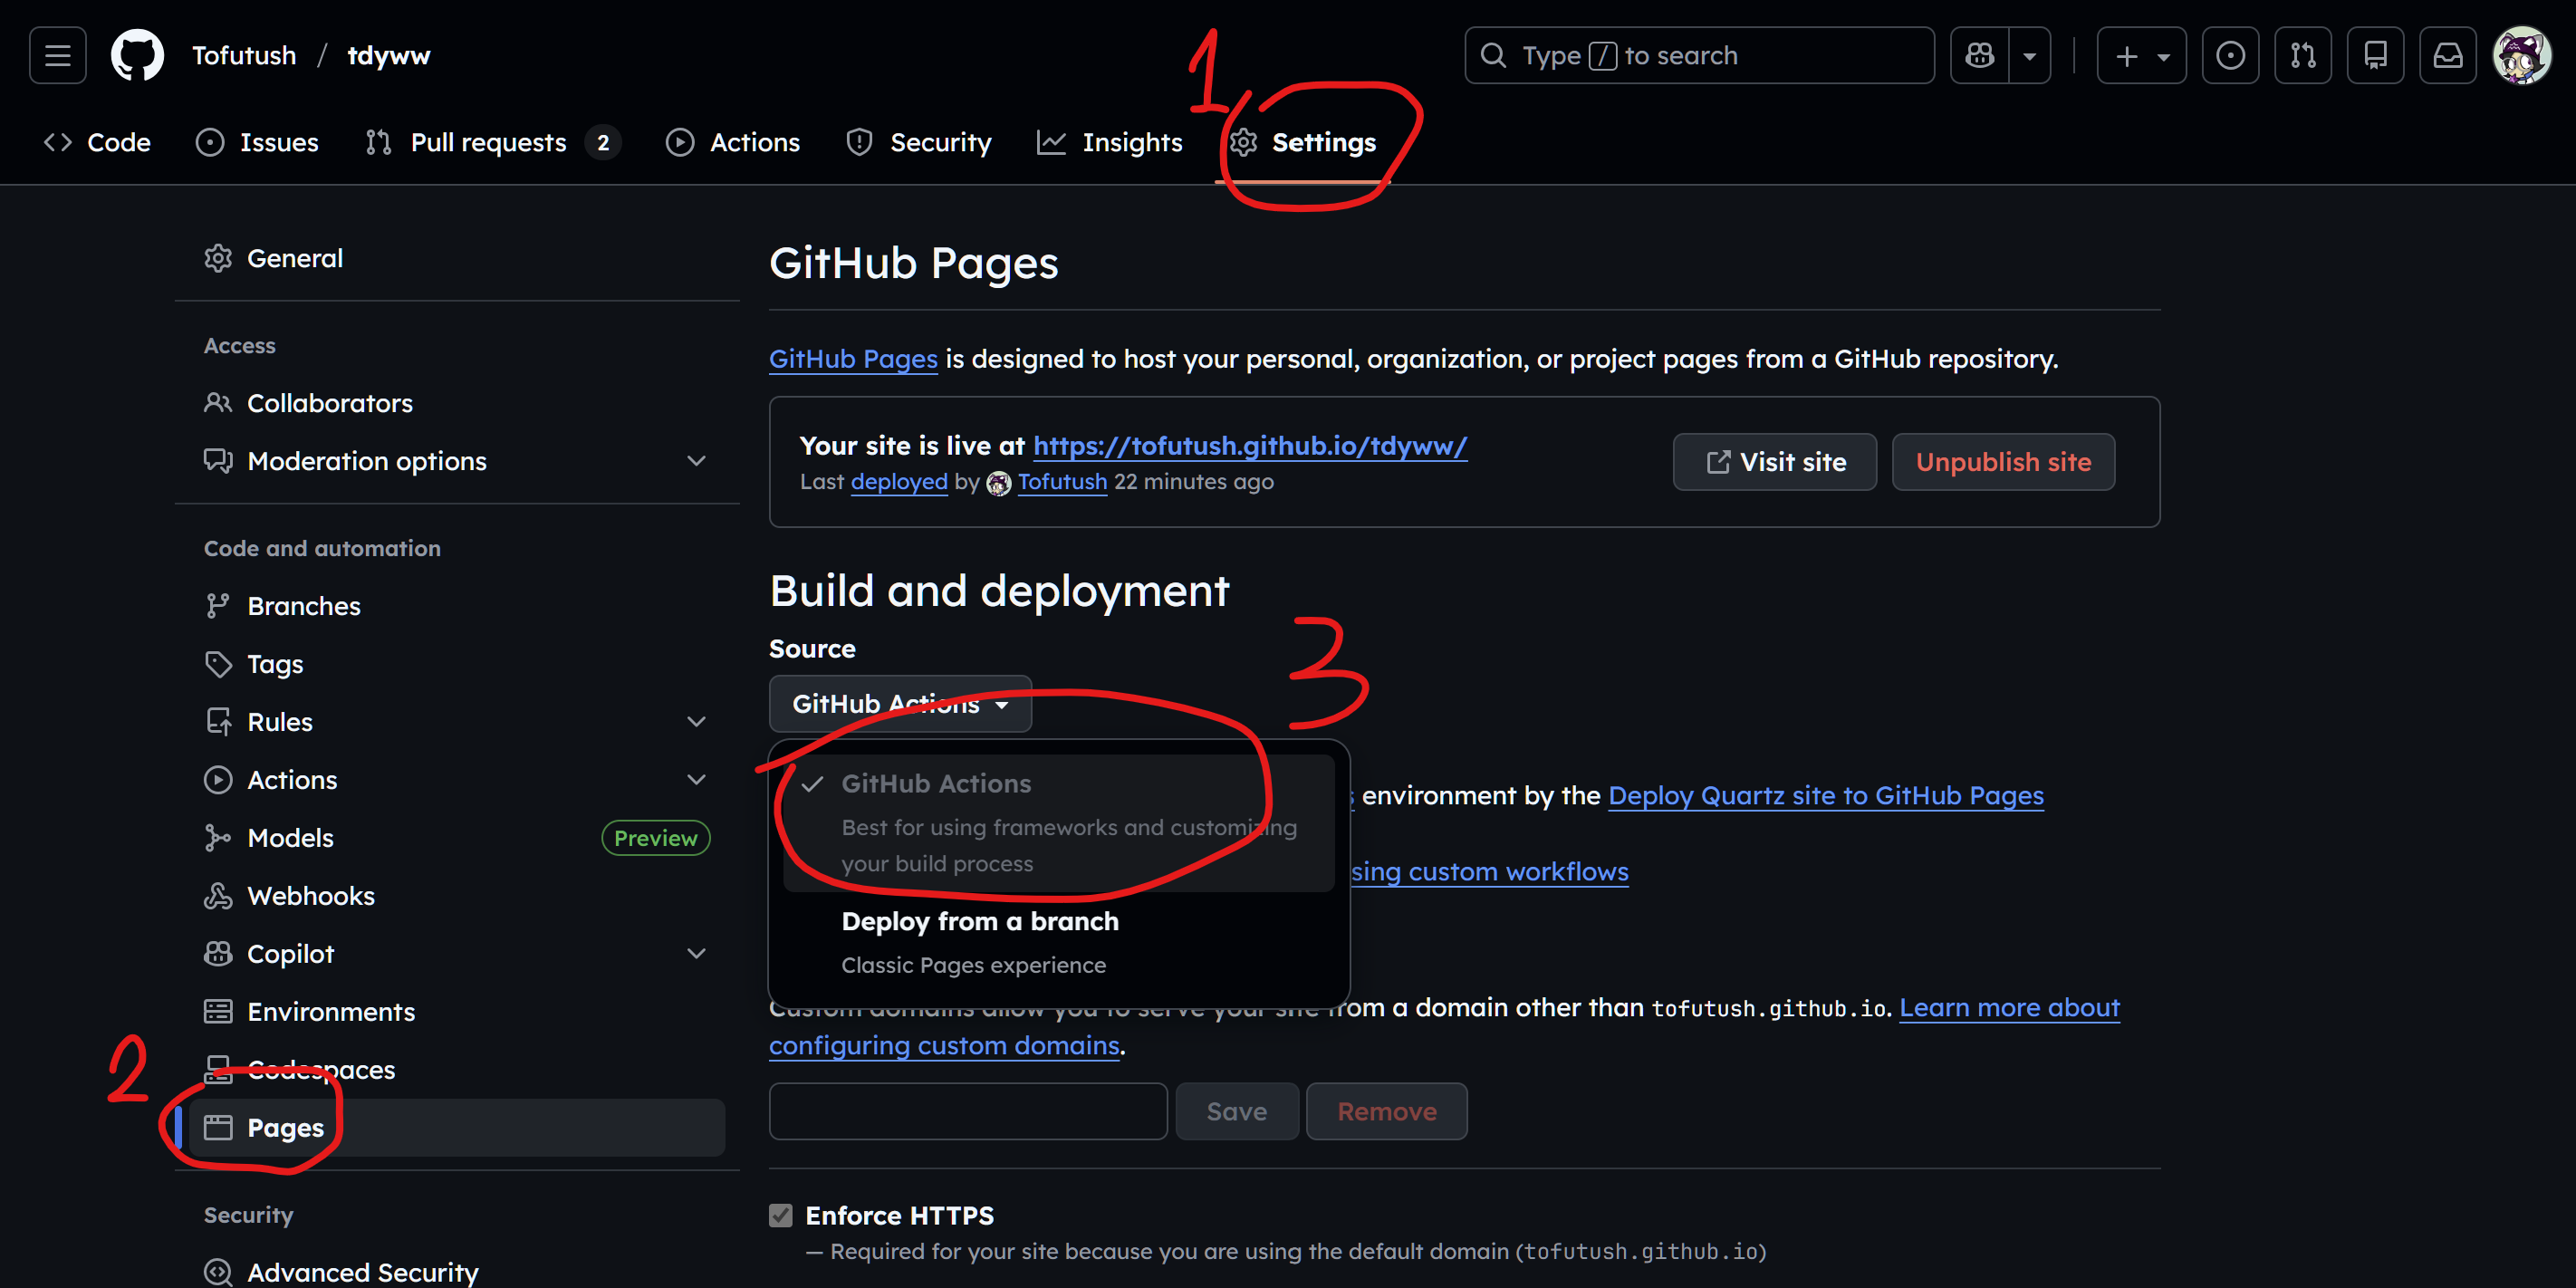
(Look, a screenshot! Wow! Yours won't have the "your site is live at" right now though.)
Then, click the "Actions" tab, and then click "general" in the dropdown. Scroll to the bottom to the "Workflow permissions" section and click "Read and write permissions." This allows the script to automatically build the site.
Getting the code for real
It's time to clone the code. Cloning is just downloading a copy of the code to your own computer, but maintaining a connection between your offline copy and Github's online copy. You need this because Obsidian runs offline.
Click the "code" button near the top-right of the repository (make sure it's your copy, not the original jackyzha0's — the URL should have your username in it instead of jackyzha0). Click "open with Github Desktop" near the bottom. Github Desktop should open, and click "choose" to pick which folder the code is going into. You have to pick an empty folder. Later, we will be moving your Obsidian vault into this folder. And wait for the code to get downloaded!
Setting stuff up
Open the folder and find the file quartz.config.ts. Here are some things you need to change.
pageTitle: this is the title that will be displayed at the top of every page. Change it to your paracosm's name! (Or anything, really.) Make sure it's not super long.pageTitleSuffix: this is a bit of text that will be added to the end of every browser tab title. Useful to also make it your paracosm's name, though remember to add a separator in front. For example, if you set it to " | tdyww" then the browser tab will be named "Characters | tdyww" if you do this.locale: language of the website.en-USwould probably be good for most of you; I had it set tozh-CNfor example.baseUrl: set this to your website's URL, but without thehttps://or a slash at the end. Mine istofutush.github.io/tdyww. Yours might either be[username].github.ioor[username].github.io/[repo name], depending on how you named your repo.- I'll get into
themelater.
After making these changes, there is the possibility of making a mistake. If you're in a code editor like VSCode, it can probably tell you when there's a mistake, but if not, you can paste it into an online validator like this. (Ignore the "Cannot find module" errors though, since they don't have them but we do.)
Also find the .github/workflows folder. Add a new file named deploy.yml and paste this code in.
name: Deploy Quartz site to GitHub Pages

on:
  push:
    branches:
      - v4

permissions:
  contents: read
  pages: write
  id-token: write

concurrency:
  group: "pages"
  cancel-in-progress: false

jobs:
  build:
    runs-on: ubuntu-22.04
    steps:
      - uses: actions/checkout@v4
        with:
          fetch-depth: 0 # Fetch all history for git info
      - uses: actions/setup-node@v4
        with:
          node-version: 22
      - name: Install Dependencies
        run: npm ci
      - name: Build Quartz
        run: npx quartz build
      - name: Upload artifact
        uses: actions/upload-pages-artifact@v3
        with:
          path: public

  deploy:
    needs: build
    environment:
      name: github-pages
      url: ${{ steps.deployment.outputs.page_url }}
    runs-on: ubuntu-latest
    steps:
      - name: Deploy to GitHub Pages
        id: deployment
        uses: actions/deploy-pages@v4
Don't change a thing here unless I tell you to.
Putting your vault in
Now it's time to move our Obsidian vault over. You have two choices here, since Quartz by default says you have to put your content inside the content folder.
Now let's find the content folder first. There should be a single .gitkeep file in there. Delete the entire folder because I say so.
Your two choices are:
I'll just use the content folder like expected.
Rename your vault to content and drag it into where the folder I made you delete used to be. After this is done, your folder structure should be: vault files inside content folder inside the repo folder. For example, say my vault used to be tdyww and there's a sparky.md inside the characters folder. So tdyww/characters/sparky.md. Now it will be my-repo-name/content/characters/sparky.md. Don't get this wrong, or, well, obviously stuff are gonna go wrong.
I don't want to rename my vault "content."
Me neither. In this case, just drag the vault over. So tdyww/characters/sparky.md turns into my-repo-name/tdyww/characters/sparky.md.
In this case, there's another setting you need to change. In the deploy.yml file, find the line that says run: npx quartz build. Add a d=folder-name to the end. Mine is run: npx quartz build d=tdyww.
If there's a space, add double quotes around the space, like d="td yww"
Try it!
Open Github Desktop again. There should be a shitton of stuff in the sidebar. These are files that had been changed. At the bottom part of the sidebar, type a message stating what you changed, and press "Commit to v4."
Committing is like a special save. It saves the files in the repo, and Git remembers that forever.
At the top, there's also a push button, probably saying "Push origin." This uploads your local files to Github. Push now.
You can commit multiple times and push them at once. Each push triggers our deploy script, and it will deploy a new version of the website.
Go back to github.com now. See how right above the files, there's your username and icon, along with the last commit message you wrote, and hopefully a brown dot there? A brown dot means our script is running. A bit later it would turn into a green checkmark. Then you can open your website and see what it looks like! If it's a red cross, then there's an error. Whoops.
If it's this particular error, Quartz's website explained how to get rid of it.
If you get an error about not being allowed to deploy to
github-pagesdue to environment protection rules, make sure you remove any existing GitHub pages environments.You can do this by going to your Settings page on your GitHub fork and going to the Environments tab and pressing the trash icon. The GitHub action will recreate the environment for you correctly the next time you sync your Quartz.
Updating the site
Just write in Obsidian as usual, and when you feel like you've written enough, go to Github Desktop, commit the files, and push! You may need to clear cache sometimes for changes to show up.
Customization
In quartz.config.ts, there's a theme part that gives you basic customization. For fonts, any Google Font works, just enter the name. You can also use a local font. For colors, secondary is the color of the links, and tertiary is the color when links are hovered over. The selection color is a semi-transparent version of tertiary. Highlight is the semi-transparent color behind each link. You can set it to complete transparent so no color shows behind links. Text highlight is the color of the highlight when you used Obsidian's highlight syntax ==content==.
Custom icon
Right now, the browser tab icon is just Quartz's default. Find the folder quartz/static, and see the icon.png inside. Replace that with whatever you want, commit, and push. You may need to clear cache for the new icon to show.